Diary

Diary

日々学んだことをアウトプットする場として初めてみました

GitHub Actions 内で diff コマンドのエラー

エラー詳細

GitHub の Actions のなかで、次のようなステップを実行しました。

- name: Build
  run: |
    ...
    diff_license=`diff "${fileA}" "${fileB}"`
    ...

ところが次のようなエラーが発生し、次に進めませんでした。

Error: Process completed with exit code 1.

diff のコマンドの部分の終了コードが 1 を返すことが問題なようです。

diff コマンドの終了コード

diff コマンドの終了ステータスは以下のようになっています。

  • 0:差分がないとき
  • 1:差分があるとき
  • 2:ファイルが存在しないとき

(予想に反して?)差分がある場合 1 が返ってきて、これが問題になっているようです。

$ echo a > a
$ echo b > b

# 差分がない場合
$ diff a a
$ echo $?
0

# 差分がある場合
$ diff a b
1c1
< a
---
> b
$ echo $?
1

# ファイルが存在しない場合
$ diff a c
> diff: c: No such file or directory
$ echo $?
2

解決策

今回の場合、diff コマンドの内容がエラーと判定されて処理が中断されてしまってることが原因のようです。

一般に、クリプトの途中のエラーで実行を中断するのは良いことが多く、set -eなどをつけることが多いです。

GitHub Actions がよしなに付けてくれているものと思われますが、これを一旦外してあげることで解決しました(基本的にはset -eをつけておいた方がいいと考え、diffコマンド直後にもとに戻しています。)

- name: Build
  run: |
    ...
    set +e
    diff_license=`diff "${fileA}" "${fileB}"`
    set -e
    ...

おわりに

GitHub Actions は詰まるところが多いですが、その分色々と勉強になって楽しいです。

次は独自の Actions を作ってみたいと思います。

連続する文字を tr で削除する

tr-sオプションを利用すると、「連続するN文字を1文字にすること」が可能です

例を見てみます

基本的な使い方

$ echo pieeeeeen
pieeeeeen

# tr -s "変換を行いたい文字"
$ echo pieeeeeen | tr -s e
pien

無駄に多い改行を削除

また次の例では、入れすぎた改行を削除することを行なっています。

# 無駄な改行が多い
$ echo -e "pi\n\n\n\n\nen"
pi


en

# 連続する改行を1つにまとめる
$ echo -e "pi\n\n\n\n\nen" | tr -s "\n"
pi
en

アルファベット以外で連続するものは削除

tr でアルファベット一般を表すには、[:alpha:]とします。

$ echo -e "my\n\n\n\nknee" | tr -s "[:alpha:]"
my


kne 

これだとアルファベットのみが対象になってしまうので、アルファベット以外を表すために、-cオプション(complement set:補集合)をつけてあげます

$ echo -e "my\n\n\n\nknee" | tr -sc "[:alpha:]"
my
knee

今回アルファベット一般を表すために[:alpha:]という表現を用いましたが、そのほかの文字クラスについては以下を参考にしてください。

$ man tr
...
[:class:]  Represents all characters belonging to 
the defined character class.  Class names are:
    alnum        <alphanumeric characters>
    alpha        <alphabetic characters>
    blank        <whitespace characters>
    cntrl        <control characters>
    digit        <numeric characters>
    graph        <graphic characters>
    ideogram     <ideographic characters>
    lower        <lower-case alphabetic characters>
    phonogram    <phonographic characters>
    print        <printable characters>
    punct        <punctuation characters>
    rune         <valid characters>
    space        <space characters>
    special      <special characters>
    upper        <upper-case characters>
    xdigit       <hexadecimal characters>
...

たとえば、大文字を小文字に変換するには以下のようにします

$ echo pien | tr "[:lower:]" "[:upper:]"
PIEN

# この方法でも可能
$ echo pien | tr "[a-z]" "[A-Z]"
PIEN
# こっちの方が拡張性は高い
$ echo pien | tr "[a-e]" "[A-E]"
piEn

他にも参考になりそうな部分は多いので、[:class:]の部分は一度眺めておくといいかもしれません。

マニュアルページ

-sオプションの部分は一応読んでおきます

$ man tr
...
-s  Squeeze multiple occurrences of the characters 
    listed in the last operand (either string1 or string2) 
    in the input into a single instance of the character. 
    This occurs after all deletion and translation is completed.
...

Github Actions から PR 上にコメントを残す

Github Actions から PR 上にコメントを残す際、actions/github-script を使うのがはやいです。

コメントを残す用途としては、次のようなケースが考えられるかと思います。

  • 初めて PR 等をする人にメッセージを送る(Welcome a first-time contributor
  • PR 上で確認できるよう、テスト等の詳細結果を表示させる

それでは早速使ってみます!

[目次]

環境

- actions/github-script@v5

actions/github-script を使ってみる

Pull requests にコメントさせてみる

ここの内容を参考に記載しています。

内部では issue comments APIを使っているみたいです。

script の部分に関しては、JavaScript が使えます。

.github/workflow/comment-test.yml

name: Comment test

on:
  pull_request:
    branches:
      - main

jobs:
  build:
    runs-on: ubuntu-latest
    steps:
      - uses: actions/github-script@v5
        with:
          github-token: ${{ secrets.GITHUB_TOKEN }}
          script: |
            const output = `### Hello World
            I'm kokoichi 👋`;
            github.rest.issues.createComment({
              issue_number: context.issue.number,
              owner: context.repo.owner,
              repo: context.repo.repo,
              body: output
            })

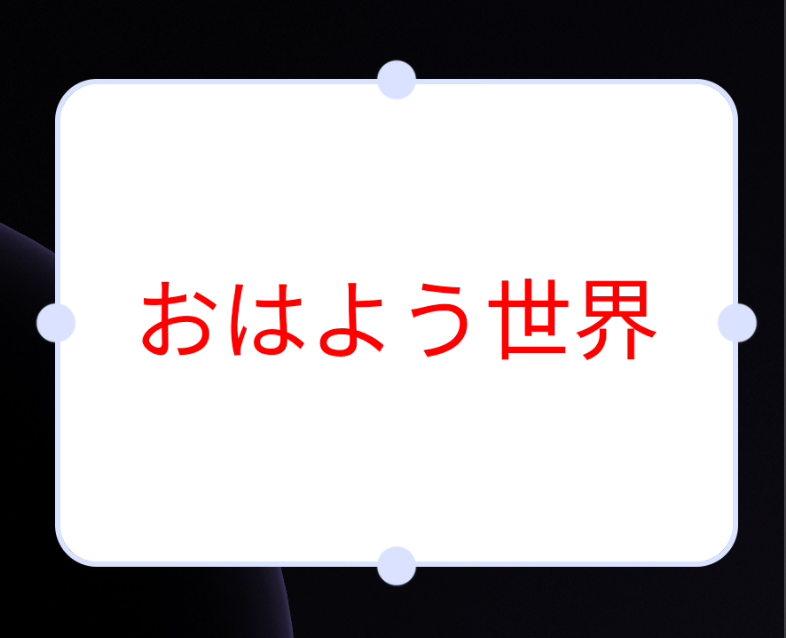
Job が成功すると、以下のようにgithub-actions [bot]からコメントをもらえます。

f:id:kokoichi206:20220129023250p:plain

context について確認する

先ほど API を使用する際、context.issue.number, context.repo.ownerなどたくさんの context.xxxが出てきました。

context は他にどのような情報を持っているか出力させてみます。

name: Just test

on:
  pull_request:
    branches:
      - main

jobs:
  build:
    runs-on: macos-latest
    steps:
      - name: View context attributes
        uses: actions/github-script@v5
        with:
          script: console.log(context)

console の出力は PR チケット上ではなく個別の Action から確認します。

context の全文を見る

Context {
  payload: {
    action: 'synchronize',
    after: '7d046eefa006497b44f55e6d6aeb6089f04f2c78',
    before: '9ce1abca8f0488d94e7f5245b3bb6c32c1643199',
    number: 6,
    pull_request: {
      _links: [Object],
      active_lock_reason: null,
      additions: 62,
      assignee: null,
      assignees: [],
      author_association: 'OWNER',
      auto_merge: null,
      base: [Object],
      body: null,
      changed_files: 4,
      closed_at: null,
      comments: 0,
      comments_url: 'https://api.github.com/repos/kokoichi206/golang-ci-cd/issues/6/comments',
      commits: 5,
      commits_url: 'https://api.github.com/repos/kokoichi206/golang-ci-cd/pulls/6/commits',
      created_at: '2022-01-28T17:23:11Z',
      deletions: 14,
      diff_url: 'https://github.com/kokoichi206/golang-ci-cd/pull/6.diff',
      draft: false,
      head: [Object],
      html_url: 'https://github.com/kokoichi206/golang-ci-cd/pull/6',
      id: 834662214,
      issue_url: 'https://api.github.com/repos/kokoichi206/golang-ci-cd/issues/6',
      labels: [],
      locked: false,
      maintainer_can_modify: false,
      merge_commit_sha: '506d957fc28eece820b8d7770d7ef0c8f8d1f736',
      mergeable: null,
      mergeable_state: 'unknown',
      merged: false,
      merged_at: null,
      merged_by: null,
      milestone: null,
      node_id: 'PR_kwDOGwIEb84xv-9G',
      number: 6,
      patch_url: 'https://github.com/kokoichi206/golang-ci-cd/pull/6.patch',
      html_url: 'https://github.com/kokoichi206/golang-ci-cd',
      id: 453117039,
      is_template: false,
      issue_comment_url: 'https://api.github.com/repos/kokoichi206/golang-ci-cd/issues/comments{/number}',
      issue_events_url: 'https://api.github.com/repos/kokoichi206/golang-ci-cd/issues/events{/number}',
      issues_url: 'https://api.github.com/repos/kokoichi206/golang-ci-cd/issues{/number}',
      keys_url: 'https://api.github.com/repos/kokoichi206/golang-ci-cd/keys{/key_id}',
      labels_url: 'https://api.github.com/repos/kokoichi206/golang-ci-cd/labels{/name}',
      language: 'Go',
      languages_url: 'https://api.github.com/repos/kokoichi206/golang-ci-cd/languages',
      license: null,
      merges_url: 'https://api.github.com/repos/kokoichi206/golang-ci-cd/merges',
      milestones_url: 'https://api.github.com/repos/kokoichi206/golang-ci-cd/milestones{/number}',
      mirror_url: null,
      name: 'golang-ci-cd',
      node_id: 'R_kgDOGwIEbw',
      notifications_url: 'https://api.github.com/repos/kokoichi206/golang-ci-cd/notifications{?since,all,participating}',
      open_issues: 1,
      open_issues_count: 1,
      owner: [Object],
      private: false,
      pulls_url: 'https://api.github.com/repos/kokoichi206/golang-ci-cd/pulls{/number}',
      pushed_at: '2022-01-28T17:26:45Z',
      releases_url: 'https://api.github.com/repos/kokoichi206/golang-ci-cd/releases{/id}',
      size: 9,
      ssh_url: 'git@github.com:kokoichi206/golang-ci-cd.git',
      stargazers_count: 0,
      stargazers_url: 'https://api.github.com/repos/kokoichi206/golang-ci-cd/stargazers',
      statuses_url: 'https://api.github.com/repos/kokoichi206/golang-ci-cd/statuses/{sha}',
      subscribers_url: 'https://api.github.com/repos/kokoichi206/golang-ci-cd/subscribers',
      subscription_url: 'https://api.github.com/repos/kokoichi206/golang-ci-cd/subscription',
      svn_url: 'https://github.com/kokoichi206/golang-ci-cd',
      tags_url: 'https://api.github.com/repos/kokoichi206/golang-ci-cd/tags',
      teams_url: 'https://api.github.com/repos/kokoichi206/golang-ci-cd/teams',
      topics: [],
      trees_url: 'https://api.github.com/repos/kokoichi206/golang-ci-cd/git/trees{/sha}',
      updated_at: '2022-01-28T15:29:33Z',
      url: 'https://api.github.com/repos/kokoichi206/golang-ci-cd',
      visibility: 'public',
      watchers: 0,
      watchers_count: 0
    },
    sender: {
      avatar_url: 'https://avatars.githubusercontent.com/u/52474650?v=4',
      events_url: 'https://api.github.com/users/kokoichi206/events{/privacy}',
      followers_url: 'https://api.github.com/users/kokoichi206/followers',
      following_url: 'https://api.github.com/users/kokoichi206/following{/other_user}',
      gists_url: 'https://api.github.com/users/kokoichi206/gists{/gist_id}',
      gravatar_id: '',
      html_url: 'https://github.com/kokoichi206',
      id: 52474650,
      login: 'kokoichi206',
      node_id: 'MDQ6VXNlcjUyNDc0NjUw',
      organizations_url: 'https://api.github.com/users/kokoichi206/orgs',
      received_events_url: 'https://api.github.com/users/kokoichi206/received_events',
      repos_url: 'https://api.github.com/users/kokoichi206/repos',
      site_admin: false,
      starred_url: 'https://api.github.com/users/kokoichi206/starred{/owner}{/repo}',
      subscriptions_url: 'https://api.github.com/users/kokoichi206/subscriptions',
      type: 'User',
      url: 'https://api.github.com/users/kokoichi206'
    }
  },
  eventName: 'pull_request',
  sha: 'aaf9140159b0fcf7c799cb1ee38236984c6c2026',
  ref: 'refs/pull/6/merge',
  workflow: 'Just test',
  action: '__actions_github-script',
  actor: 'kokoichi206',
  job: 'build',
  runNumber: 8,
  runId: 1762790245,
  apiUrl: 'https://api.github.com',
  serverUrl: 'https://github.com',
  graphqlUrl: 'https://api.github.com/graphql'
}

触ってみっての注意点

~v4, v5 では大きく異なる

「github-script の v5 における破壊的な変更」にもありますが、v5 では github REST API 以外も対応するようになりました。

そのため、v4 以前で使っていたような API に対しては、明示的に github.rest.***のように REST であることを教えてあげるような API 名に変更になりました。

複数のサイトを参考にする際は注意しましょう。

Github API にとって issues と PRs の区別はない

github.rest.issues.createCommentの名前から、勝手に Github の各プロジェクトにある "Issues" にコメントをするものかと勘違いしていました。

勘違いしたまま Pull requests に対してコメントを送る方法がないかと探していたのですが、どうやら Github API において issue と pull request は同じだそうです!!

今年度一番の驚きです。

以下は stack overflow の記事のコメントより

A canonical way is using the official Github Script actions. Don't get confused, issues and PRs are the same for the GitHub API.

おわりに

より実践的な CI/CD を組む際にぜひ使ってみたいです。

Android における Process Death

Process Death とは

アプリがバックグラウンドで動いている場合などに、リソースの都合で Android システムがアプリを停止させること。

Android Studio で Process Death 実行

Android Studio で Process Death と同等のことをするには、Logcat 画面の端に存在する赤い四角ボタンを押します。

f:id:kokoichi206:20220128035324p:plain

問題点と対策

問題点

当たり前ですが、保存されてない変数は破棄されます。

ところが、ユーザー目線で「復帰後に元の状態を期待する」ような場合も多々あります。

ViewModel() において対策の実装 

みんな大好き ViewModel は、rotation 状態などの構成の変更に対しては柔軟に処理してくれるものの、Process Death に関しては対応してくれません。

そのため Process Death 後に復旧するためには、自分で savedStateHandle 等でバックアップをとっておく必要があります。

実装例は以下のようになります。

class MainViewModel(
    private val savedStateHandle: SavedStateHandle
): ViewModel() {

    var counter by mutableStateOf(savedStateHandle.get("counter") ?: 0)
        private set

    fun count() {
        counter++
        savedStateHandle.set("counter", counter)
    }
}

Links

おわりに

Android において気をつけるべきこと」みたいなものにも少しずつ詳しくなっていきたいです。

Jetpack Glance で遊んでみた

前回の記事では Jetpack Glance を使って Widget を実際に表示させるところまで行いました。

今回はGlanceAppWidgetを継承させたクラスをいじって、色々と表示を変えて遊んでみようと思います!

[目次]

環境

- compose-version : 1.1.0-beta03
- 使用 glance version : 1.0.0-alpha02
- 検証 android 端末 : pixel3-os12

サイズによって内容を変更する

widget の大きさに応じて表示内容の調整を行いたい場合、SizeModeを override することで実現します。

次のどちらかのパターンで行います。

exact

サイズの変更を検知し、その度に再描画が走ります。

Composable 関数の中で使用するには、LocalSize.currentでサイズを取得します。

class MyWidget(private val name: String) : GlanceAppWidget() {

    // sizeMode を override する
    override val sizeMode = SizeMode.Exact

    @Composable
    override fun Content() {
        val size = LocalSize.current
    }
}    

Responsive

サイズの変更を検知し、用意した値に近いものに設定されます。

設定が変更されると再描画が走ります。

class GreetingsWidget(private val name: String) : GlanceAppWidget() {

    // 使いたいサイズを用意する
    companion object {
        private val SMALL_SQUARE = DpSize(100.dp, 100.dp)
        private val HORIZONTAL_RECTANGLE = DpSize(250.dp, 100.dp)
        private val BIG_SQUARE = DpSize(250.dp, 250.dp)
    }

    // sizeMode を override する
    override val sizeMode = SizeMode.Responsive(
        sizes = setOf(SMALL_SQUARE, HORIZONTAL_RECTANGLE, BIG_SQUARE)
    )

    @Composable
    override fun Content() {
        val size = LocalSize.current
        val context = LocalContext.current

        if (size.height > SMALL_SQUARE.height) {
            Text("xxx")
        }
        ...
    }
}

いろいろな関数で遊ぶ

標準で用意されている関数に何があるか、androidx.glance.まで打って候補として出てくるものを一度眺めてみると良いと思います。

以下、コード例とスクショ(+感想)をメモしておきます

import 時の注意

Jetpack compose とは使用するものが異なるため、import 時には正しいものを選ぶようにしてください。

例えば以下はTextに対する import の候補なのですが、特に compose.uiのものと間違えないよう、きちんと~~.glance.~~となっているものを選択してください。

f:id:kokoichi206:20220128024148j:plain

Box

全体的に compose と似ている。

Box(
    modifier = GlanceModifier
        .fillMaxSize()
        .background(Color.White)
        .cornerRadius(8.dp),
    contentAlignment = Alignment.Center,
) {
    Text(
        text = "おはよう世界",
        style = TextStyle(
            color = ColorProvider(Color.Red),
            fontSize = 36.sp,
        )
    )
}

f:id:kokoichi206:20220128023744p:plain

Image

Box(
    modifier = GlanceModifier
        .fillMaxSize()
        .background(Color.White)
        .cornerRadius(8.dp),
    contentAlignment = Alignment.Center,
) {
    Image(
        modifier = GlanceModifier
            .cornerRadius(5.dp),
        provider = ImageProvider(R.drawable.gan),
        contentDescription = "generated by gan"
    )
}

f:id:kokoichi206:20220128024523p:plain

Column

Column(
    modifier = GlanceModifier
        .wrapContentHeight()
) {
    for(i in 1..10) {
        Text(
            text = "$i"
        )
    }
}

f:id:kokoichi206:20220128025119p:plain

しかしこのままでは 5 以降が切れてしまっている上に、スクロールもできません。

そんな時は、Jetpack Compose でもお馴染みの LazyColumn を使います。

LazyColumn

LazyColumn(
    horizontalAlignment = Alignment.Horizontal.CenterHorizontally,
) {
    items(10) { id ->
        Text(
            text = "$id",
        )
    }
}

左端に寄っちゃってますが、スクロールできるようになっています。

f:id:kokoichi206:20220128025621p:plain

Button

Button には onClick の属性が必須だったため、MainActivity を起動させてみてます。

Button(
    text = "Click me",
    // MainActivity を起動させる。
    onClick = actionStartActivity<MainActivity>(),
)

f:id:kokoichi206:20220128030037p:plain

レスポンシブルな widget 作成

Row, Column, sizeMode などを使い、サイズによって表示内容の変わる widget を作成してみました。今回は sizeMode の override に exact パターンを使っています。

表示されている widget の行数や列数を取得する方法がわからなかったため、途中で汚い計算をしていますがお許しください。

class MyWidget(private val name: String) : GlanceAppWidget() {

    override val sizeMode = SizeMode.Exact

    @Composable
    override fun Content() {
        val size = LocalSize.current

        Column(
            modifier = GlanceModifier
                .background(Color.White)
                .fillMaxSize()
        ) {
            val col = ((size.height - 90.dp) / 100.dp).toInt() + 1
            val row = ((size.width - 57.dp) / 70.dp).toInt() + 1
            Log.d("hoge", "size.width: ${size.width}")
            Log.d("hoge", "size.height: ${size.height}")
            for (i in 1..col) {
                Row(
                    modifier = GlanceModifier
                        .fillMaxWidth()
                        .defaultWeight(),
                ) {
                    for (j in 1..row) {
                        Box(
                            modifier = GlanceModifier
                                .defaultWeight()
                                .fillMaxHeight(),
                            contentAlignment = Alignment.Center,
                        ) {

                            val position = "$j$i"
                            Text(
                                text = position,
                            )
                            // Text or Image で実験をした
//                            Image(
//                                modifier = GlanceModifier
//                                    .size(60.dp),
//                                provider = ImageProvider(R.drawable.gan),
//                                contentDescription = "image generated by gan"
//                            )
                        }
                    }
                }
            }
        }
    }
}

f:id:kokoichi206:20220128031515p:plain

f:id:kokoichi206:20220128031726p:plain

遊んでみての所感

- Jetpack Compose に似ていて楽しい
- Jetpack Compose 用の API とは似ているが異なるものなので、import を慎重に選ぶ
- いちいち XxxProvider を使わないといけなかったり少しめんどい
  - 引数等きちんと確認する
- Widget の更新は効かないので、再度作り直す(削除⇨再度Widget登録)

おわりに

初めての widget 作成にもかかわらず、楽しく作ることができたのは Jetpack さんのおかげだと思います。

beta・安定版になるのを楽しみに待ってます!

Jetpack で Widget を作成

「Jetpack Glance が α 版になったらしい」という記事を見て早速遊んでみました。

予想以上に文章が長くなってしまったので、色々といじってみるのは次回にし、今回は『widget を表示させるところまで』をゴールにします。

[目次]

環境

- compose-version : 1.1.0-beta03
- 使用 glance version : 1.0.0-alpha02
- 検証 android 端末 : pixel3-os12

Widget 作成手順

次の 5 ステップで Widget を作成します

1. 依存関係の追加

Compose の新規プロジェクトを作成した後、変更を加えた点について記載しておきます。

アプリレベルの build.gradle

プロジェクト作成時から変更した点

  • kotlinCompilerVersion -> '1.6.0'
  • 依存関係を追加
    • androidx.glance:glance-appwidget
...
android {
    ...
    kotlinOptions {
        jvmTarget = '1.8'
    }
    buildFeatures {
        compose true
    }
    composeOptions {
        kotlinCompilerExtensionVersion compose_version
        kotlinCompilerVersion '1.6.0'
    }
}

dependencies {
    ...
    implementation "androidx.compose.ui:ui:$compose_version"
    implementation "androidx.compose.material:material:$compose_version"
    ...

    // Jetpack Glance
    // Widget を触るだけなら不要
    // implementation "androidx.glance:glance:1.0.0-alpha02"
    implementation 'androidx.glance:glance-appwidget:1.0.0-alpha02'
}

プロジェクトレベルの build.gralde

プロジェクト作成時から変更した点

  • compose_version -> 1.1.0-beta
  • gradle-plugin -> 1.5.31
buildscript {
    ext {
        compose_version = "1.1.0-beta03"
    }
    repositories {
        google()
        mavenCentral()
    }
    dependencies {
        classpath "com.android.tools.build:gradle:7.0.4"
        classpath "org.jetbrains.kotlin:kotlin-gradle-plugin:1.5.31"
    }
}

2. Widget 表示用の新規ファイルを作成

GlanceAppWidgetを継承したクラスとGlanceAppWidgetReceiverを継承したクラスの2つを作成します(kotlin では2つのクラスを並列に1つのファイルに作成できます!)

GlanceAppWidget#Content()に表示させる関数を記入したらいいのですが、いろいろ遊ぶのは後にしてとりあえず表示させることを目指します。

class MyWidget(private val name: String) : GlanceAppWidget() {

    @Composable
    override fun Content() {
        Text(
            text = "おはよう世界"
        )
    }
}

class MyWidgetReceiver : GlanceAppWidgetReceiver() {
    override val glanceAppWidget = GreetingsWidget("Glance")
}

3. AndroidManifest に receiver を登録

<application
    ...>
    <!-- android:nameは継承して作った receiver を指定します -->
    <receiver
        android:name=".MyWidgetReceiver"
        android:enabled="true"
        android:exported="false">
        <intent-filter>
            <action android:name="android.appwidget.action.APPWIDGET_UPDATE" />
        </intent-filter>

        <meta-data
            android:name="android.appwidget.provider"
            android:resource="@xml/first_glance_widget_info" />
    </receiver>
    ...

ここで resource ファイルの記述に赤線が引かれると思うので、作成していきます。

4. meta-data 用の resource ファイルを作成

Android Studio 上で赤く波線の引かれているandroid:resource="@xml/first_glan ce_widget_info"の上でALT + Enterを押すことで res/xml の中に対象ファイルを作成します。

今回はシンプルに以下のようにしています。

<?xml version="1.0" encoding="utf-8"?>
<appwidget-provider xmlns:android="http://schemas.android.com/apk/res/android"
    android:resizeMode="horizontal|vertical"
    android:initialLayout="@layout/widget_loading"
    android:targetCellWidth="1"
    android:targetCellHeight="1"
    android:widgetCategory="home_screen" />

他にどのような指定ができるかは、android:まで打って候補として出てくるものを眺めるといいと思います。また、android:targetCellWidth(Height)API-31 以上しか対応していないためご注意ください。

ここでまた新たな resource ファイル、"@layout/widget_loading"が出てきました。

せっかく xml レイアウトから卒業できると思ったのですが、android:initialLayoutの指定は現時点では必須らしいので頑張って作りましょう。

5. initialLayout の作成

4 の時と同様に、赤線の上でALT + Enter を押すことで layout ファイルを作成します。

Jetpack Glance で作成した関数が描画されるまでの間に表示されるものなので、基本は見ることがないと思っています。

<?xml version="1.0" encoding="utf-8"?>
<FrameLayout xmlns:android="http://schemas.android.com/apk/res/android"
    android:layout_width="match_parent"
    android:layout_height="match_parent">

    <TextView
        android:layout_width="match_parent"
        android:layout_height="match_parent"
        android:layout_gravity="center"
        android:text="Now Loading..."
        android:gravity="center"
        />
</FrameLayout>

長かったですがこれにて作成完了です。お疲れ様でした。

Widget 動作確認

step 5 まで終わったら一度アプリを実行してみます。

立ち上がったアプリを一旦閉じ、ディスプレイを長押しします。

f:id:kokoichi206:20220128011612p:plain

Widgets という選択肢をクリックします。

上手くいっていれば、作成したプロジェクト名の widget プレビューが表示されています。

f:id:kokoichi206:20220128011728p:plain

なお、ここの見た目は meta-data 用の resource ファイルで変更可能です。

アイコンをドラッグして、ディスプレイにドロップしてみましょう。

f:id:kokoichi206:20220128012147p:plain

無事 Widget が作成されました!!

図の丸い部分を掴むことで大きさも変更可能です。

f:id:kokoichi206:20220128012240p:plain

おわりに

初めて Widget の作成をしてみましたが、より開発者っぽいことをしてる実感が出てきました。

次回は Jetpack Glance を触っていきます!

m1 mac で Execution failed for task ':app:kaptDebugKotlin'.

m1 mac で、今まで通ってたビルドが通らない現象が発生しました。

その際のエラーメッセージと解決策をメモしておきます。

エラー内容

Execution failed for task ':app:kaptDebugKotlin'.
> A failure occurred while executing 
org.jetbrains.kotlin.gradle.internal.KaptWithoutKotlincTask$KaptExecutionWorkAction
   > java.lang.reflect.InvocationTargetException (no error message)

解決策

この質問サイトによると SQLite のバージョンが問題のようです。

SQLite supported M1 in versions greater or equal than 3.34.0. Check your dependencies list.

今回は room ライブラリで用いる SQLite が原因でした。

kapt "org.xerial:sqlite-jdbc:3.34.0"を依存関係(アプリレベルの build.gradle)に追加します

dependencies {
    ...

    // Room
    implementation "androidx.room:room-runtime:2.3.0"
    kapt "androidx.room:room-compiler:2.3.0"

    // Fix sqlite database error in m1 mac
    kapt "org.xerial:sqlite-jdbc:3.34.0"
}

Links

おわりに

今まで動いてたプロジェクトが動かなくなったかと思って焦りました。

gradle 周りにはまだ苦手意識があるので、自信を持って Android の環境構築できるよう頑張ります